Tuesday, February 26, 2013

CANNED BEANS: Slow cooker Chili


Featured Item
CANNED BEANS


My family does not eat beans. Period. It's a done deal for them. So when I started getting into food storage I was so worried. What are we going to eat!? Everyone tells you to store beans. Well . . As time went on I just learned to trick my family into eating beans. :)

Dried beans are great to store because they keep for so long and are jam packed with nutrition. Tiffany posted an awesome post about how to prepare dried beans, you can find it HERE.

I trick my family into eating beans by making a puree and then hiding it in foods.

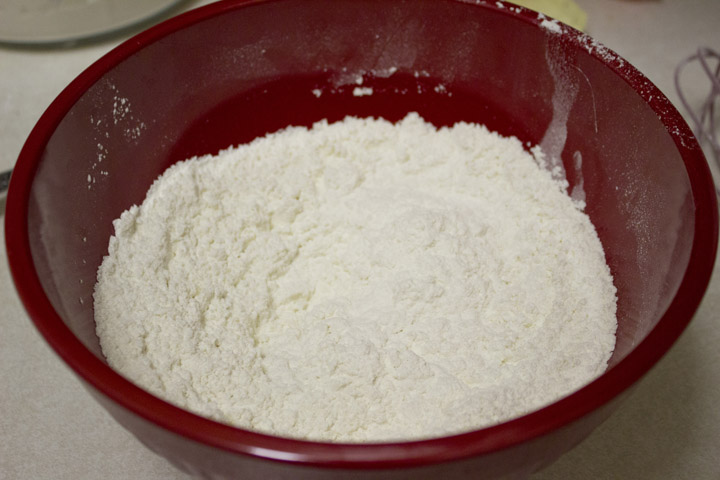
Start with the can of beans. I found this awesome Tri Bean blend at the grocery store, a little bit of each bean. Pour it in to your food processor or blender.


Then blend, blend, blend, and Whala! Beautiful Bean Puree!


I added by by bean paste into this chili recipe. It was delicious and everyone loved it. Little did they know, it had beans in it. SHH don't tell them, or your picky eaters.


Slow Cooker Chili

Makes 6 servings
Cook time: 5-6 hours

Ingredients:

1 tablespoon vegetable oil
1 pound ground beef
½ medium onion, diced
2 teaspoons minced garlic
3 celery stalks diced
3 large carrots diced
1 can beans, whatever your favorite flavor is
1 can diced tomatoes, slightly drained
½ teaspoon hot sauce
1 tablespoon chili powder
1 tablespoon parsley
1 teaspoon salt
1 teaspoon cumin
½ teaspoon thyme
½ teaspoon pepper
12 ounces beer, if you buy a 24 ounce can you can use the second half to make this recipe!

Shredded cheese and sour cream for topping


Directions:

Heat the veggie oil in a large skillet to medium high. Add the onions and cook until softened, about 3 to 5 minutes. Add the ground beef and stir until mostly browned, 5 to 7 minutes. Add the garlic and cook until all the beef is brown 2 to 3 more minutes.

In the bowl of a slow cooker, add the celery, carrots, beans, tomatoes, and hot sauce and then mix to combine.

In a small bowl combine the chili powder, parsley, salt, cumin, thyme, and pepper. Mix thoroughly and then add to the bowl of the slow cooker.

Pour the ground beef mixture in the bowl and then add the beer. Stir the mixture so that everything is well mixed.

Cook the chili on low for 5 to 6 hours.

Top with shredded cheese and sour cream.

How do you get your family to eat your food storage items?
Please share with us by email or a comment!

Friday, February 22, 2013

Rotating Recipe: SWEET SESAME SALMON

Here is another great recipe that will help you
rotate your food storage

ROTATING RECIPE:

The golden rule in food storage is store what you eat and eat what you store.
These “Rotating Recipes” will help you eat what you store.


SWEET SESAME SALMON
Here are the Items you will rotate
  • Soy Sauce
  • Lemon Juice
  • Sesame Oil


Here are some of our favorite recipes that use these ingredients:


 Sweet Sesame Salmon

I love salmon and am always trying out new recipes. The problem with new salmon recipes is that they are very hit or miss. I found this recipe in Real Simple Magazine and just loved it. What is great about this recipe is that my family loved it too.

Serves 4
Cook Time: 45 minutes

Ingredients:

2 tablespoons vegetable oil
4 tablespoons soy sauce
2 tablespoons lemon juice
2 tablespoons brown sugar
2 teaspoons onion powder
1 teaspoon sesame oil
2 teaspoons minced garlic
¼ teaspoon black pepper
2 large salmon fillets

Directions:

In a large Ziploc bag combine all ingredients except the salmon fillets. Shake the bag vigorously to make sure everything is mixed well. Use your fingers to mix through the bag is need be.

Remove 4 tablespoons of the mixture and place in small skillet.

Cut each salmon fillet in half and place in the Ziploc bag. Press as much air out of the bag as possible and let the salmon marinate for 20 to 30 minutes.

15 minutes before the marinade is finished, preheat the broiler on your oven and begin heating the sauce in the skillet to medium low heat.

Place the salmon fillets on a roasting rack and broil for 8 to 10 minutes or until the salmon is flakey. Flip half way through cooking.

Top the salmon with the sauce from the skillet.


Monday, February 18, 2013

Homemade Item: CAKE FLOUR


Have you ever bought a large bag of cake flour so you could use just a little bit for one recipe? I have so many times until I realized that I can make a cake flour substitute. This works just as well, if not better, because I have all the ingredients at home and I can make as much or a little as I need.

Cake flour is just super refined flour that bakes up lighter and fluffier that regular four. Wit out further ado, here is the recipe I like to use.

Take your favorite cornstarch


Measure out 2 tablespoons


Dump it into a 1 cup measuring cup


Fill the rest of the cup with flour


Dump the cup into a mixing bowl


Mix thoroughly, you could also use a sifter and just sift a few times


Now you have one cup of cake flour substitute, repeat recipe for however many cups of cake flour you need.

Sunday, February 10, 2013

Homemade Item: SPAGHETTI SAUCE

Why buy something when you can make it yourself? I understand when things get super difficult that it's just easier to buy premade. This is not one of those things, however. It is easy and just as tasty - or more so - than what you could get from the store. Plus you made it yourself which automatically makes you cool.

Empty your cans of tomatoes and tomato paste into a crock pot.


Heat 1 tbsp olive oil in a frying pan.


Dice your onion and add the onion and garlic to the heated oil and saute for 1-2 minutes.


While the onions are garlic are sauteing, add the water to the tomatoes and mix well. I used my immersion blender so that my sauce would be nice and smooth. You can leave it chunky, or make it smooth however works best for you.


Add in the onions, garlic, all the seasonings except for the bay leaves, and the remaining 3 tbsp olive oil. 


Mix it all together


...and put the bay leaves on top.


Cook in the crockpot on high for 3 hours, stirring occasionally. 


When your 3 hours are almost up, brown 1lb of Italian sausage (I use hot Italian sausage) or ground beef.


Remove the bay leaves - be warned, you might have to dig for them.


Give it one last stir.


Add about 1 1/2 cups to the pan with your browned meat and allow to heat and mesh flavors together for about 5 minutes. Serve over noodles and enjoy!


Since it makes much more than 1 1/2 cups, I froze the rest for later use. 3 times of spaghetti in one go? Yes, please!


Ingredients:
1 onion
2 tbsp minced garlic
4 tbsp olive oil, divided
3 14.5 oz cans tomatoes - any kind works, I used diced
3 6 oz cans tomato paste
2 cups water
1/4 tsp salt
1/2 tsp pepper
1 tsp dried basil
1 tsp dried oregano
1/2 tsp garlic powder
1 tsp dried thyme
1 tsp Italian seasoning
1 tbsp dried parsley
2 bay leaves
 
Directions:
 
Empty your cans of tomatoes and tomato paste into a crock pot.

Heat 1 tbsp olive oil in a frying pan. Dice your onion and add the onion and garlic to the heated oil and saute for 1-2 minutes.

While the onions are garlic are sauteing, add the water to the tomatoes and mix well. Add in the onions, garlic, all the seasonings except for the bay leaves, and the remaining 3 tbsp olive oil and mix well. Put the bay leaves on top.
Cook in the crockpot on high for 3 hours, stirring occasionally. 

When your 3 hours are almost up, brown 1lb of Italian sausage (I use hot Italian sausage) or ground beef.

Remove the bay leaves and give it one last stir. Add about 1 1/2 cups to the pan with your browned meat and allow to heat and mesh flavors together for about 5 minutes. Serve over noodles and enjoy!
Since it makes much more than 1 1/2 cups, freeze the rest for later use - good for 4-6 months frozen according to StillTasty.

Wednesday, February 6, 2013

PUMPKING: Pumpking Ravioli Filling

About a year ago, my relationship with the store bought cheese filled ravioli was straining. It was just the same old thing every time and I was tired of it. I needed some excitement in my ravioli filling, I needed a change. So we broke it off and I ventured out on my own and never looked back.

With the right tools, homemade ravioli is so incredibly easy so don’t be scared of it.  The taste is so fresh and flavorful, you will never look at store ravioli the same. Here are my favorite pasta and ravioli making tools. They work great! You can see directions for how to use the ravioli maker here.

Whenever I make something with pumpkin I seem to end up with a half can of pumpkin in my fridge and I don’t know what to do with it.


This ravioli filling recipe is the perfect way to finish off a can of pumpkin. Once again Epicurious has a fabulous recipe bursting with delicious pumpkin making it perfect for a cold winter evening.  I love pumpkin flavor so this filling has been placed at the top of my list of favorite fillings.

Here are all the ingredients in my food processor; it smells like fall and cold weather.


Nice and mixed together!


I didn’t have any more breadcrumbs so I had to use cornflake crumbs to make the paste. It seemed to turn out ok.


The ravioli turned out very delicious. We topped them with alfredo sauce, you can find a great recipe here!

This is a close up on the filling, look at the flavor.

Dinner Recipe
Pumpking Ravioli Filling

Makes: 8 Serving
Cook Time: 10 minutes, does not include time to make the ravioli

Ingredients:

¾ cup canned pumpkin puree
½ cup ricotta cheese
1/3 cup parmesan cheese
1 egg
½ teaspoon salt
¼ teaspoon nutmeg
¼ teaspoon black pepper
Dash of Cinnamon
Dash of Ginger
Dash of Colve
Handful of breadcrumbs

Directions:

In a food processor, combine all the ingredients and mix well until all the ingredients are combined. Slowly add in the breadcrumbs, about a tablespoon at a time, until the mixture becomes paste like.

Use the mixture in your favorite filled pasta. 

Tell us what you made!
How do you like to use up the rest of a can of pumpkin? Leave a comment of send us an email.


Saturday, February 2, 2013

Homemade Item: RAVIOLI with NORPRO RAVIOLI MAKER

I picked up this gadget from Amazon in hopes that it will help in my ravioli-making journeys.

There are two main parts to this gadget. First, and most important, is the press.


SIDE NOTE: Ravioli presses come in many shapes and sizes. Keep a look out for vintage ones at garage sales.

The second piece is the dimpler. It’s plastic with bumps on it.


The product worked great once I learned how to use it. I found the directions on the box very confusing, but many YouTube videos later, I finally figured it out.

So, to help out others, here are step by step instructions, complete with pictures, on how to use the Norpro ravioli maker.